Erste Schritte zum eigenen Projekt/en: Unterschied zwischen den Versionen
(Die Seite wurde neu angelegt: „=== Designing the project === <gallery widths=300px heights=200px> Datei:04 Editor.png|A project usually consists of several parts which, like presentation s…“) |
(Die Seite wurde neu angelegt: „=== Resampling === For all analyses that involve calculations based on several participants (e.g. calculating the mean value of a slider position across all pa…“) |
||
| (11 dazwischenliegende Versionen desselben Benutzers werden nicht angezeigt) | |||
| Zeile 40: | Zeile 40: | ||
</gallery> | </gallery> | ||
| − | + | You can: | |
| − | * passive | + | * Add passive elements (decorative/ informative) |
| − | * | + | * Create text boxes |
| − | * | + | * Embed audio and video files |
| − | * | + | * Embed buttons and links |
| − | * | + | * Integrate interactive websites with iframes |
| − | * 1D | + | * Create and personalise 1D and 2D scales for real-time data acquisition |
| Zeile 53: | Zeile 53: | ||
| − | ==== | + | ==== Integrate audio and video files ==== |
| + | |||
<gallery widths=300px heights=200px> | <gallery widths=300px heights=200px> | ||
| − | Datei:07 Audio einfügen.png| | + | |
| − | Datei:06 Audio hochladen.png| | + | Datei:07 Audio einfügen.png|Click the ‘Add audio’ button. |
| + | |||
| + | Datei:06 Audio hochladen.png|Upload a file here or select an audio from the 'Files' tab that you have previously uploaded there. | ||
| + | |||
</gallery> | </gallery> | ||
| − | ==== | + | ==== Real-time data acquisition: use of scales (sliders) ==== |
<gallery widths=300px heights=200px> | <gallery widths=300px heights=200px> | ||
| − | Datei:09 Skala einfügen.png| | + | |
| − | Datei:10 Skala beschriften .png| | + | Datei:09 Skala einfügen.png|The 1D scales shaped like sliders can be easily added as an element and further customised and personalised in the inspector. |
| + | |||
| + | Datei:10 Skala beschriften .png| Customise the alignment, values and step intervals according to your needs. | ||
| + | |||
</gallery> | </gallery> | ||
| − | + | Data collection is always linked to an event (e.g. a piece of music). Create as many parts as you like for different events, which you or the participants can navigate through during realisation. | |
| − | == | + | == Realisation == |
| − | === | + | === Create realisation === |
<gallery widths=300px heights=200px> | <gallery widths=300px heights=200px> | ||
| − | Datei:11 Durchführung-Reiter.png| | + | |
| − | Datei:12 Durchführung erstellen Dialog.png| | + | Datei:11 Durchführung-Reiter.png|Save the project and click on ‘New realisation’ in the ‘’Realisations‘’ tab. |
| − | Datei:13 Durchführung Übersicht.png|emoTouch | + | |
| + | Datei:12 Durchführung erstellen Dialog.png| Give the realisation a title and shortcode and set the starting time. You can either activate the realisation now or schedule it to start at a later time. | ||
| + | |||
| + | Datei:13 Durchführung Übersicht.png|emoTouch now creates a QR code, a link and a shortcode that participants can use to join the event without registering. The shortcode can be entered on www.emotouch.de. | ||
| + | |||
</gallery> | </gallery> | ||
| − | === | + | === Managing Realisations === |
<gallery widths=300px heights=200px> | <gallery widths=300px heights=200px> | ||
| − | Datei:14 Liste Durchführungen.png| | + | |
| + | Datei:14 Liste Durchführungen.png|Keep an overview of planned, ongoing and completed realisations in the "Realisations" tab. Any number of participants can join a running realisation. They each create a ‘session’. Click on a realisation in the list for an overview of the sessions that have been created. | ||
| + | |||
</gallery> | </gallery> | ||
| − | + | You can run several active realisations at the same time. Caution: Pausing is not possible. Ending a realisation will terminate it permanently. | |
| + | |||
| + | == Analysing - exporting values and data == | ||
| − | |||
<gallery widths=300px heights=200px> | <gallery widths=300px heights=200px> | ||
| − | Datei:15 Zum Export Button.png| | + | Datei:15 Zum Export Button.png|Close the realisation when you have collected all of the desired data. Click on the ‘’‘completed’‘’' realisation that you want to analyse and click the “EXPORT” button. |
| − | Datei:16 Daten exportieren Dialog.png| | + | |
| + | Datei:16 Daten exportieren Dialog.png|Configure formatting details. emoTouch creates a CSV file with the raw data, or optionally resampled data, which can be further processed with any spreadsheet or statistics software. | ||
| + | |||
</gallery> | </gallery> | ||
| Zeile 103: | Zeile 119: | ||
=== Resampling === | === Resampling === | ||
| − | + | For all analyses that involve calculations based on several participants (e.g. calculating the mean value of a slider position across all participants at a specific time stamp), the raw data recorded by emoTouch must be converted into ‘resampled data’. | |
Aktuelle Version vom 24. Oktober 2024, 11:33 Uhr
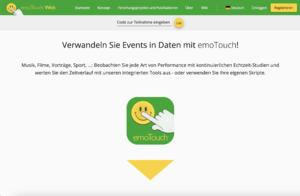
Here you can follow all the steps involved in conducting a project with emoTouch, from preparation to evaluation. A playback project for real-time data collection while listening to a piece of music is created as an example.
In playback projects, audio or video files are integrated into the project and the participants navigate through the parts themselves. In contrast, live projects take place simultaneously with an event, on the basis of which data is collected and the manager navigates all participants through the project all at once.
Preparation/ considerations
Depending on the research context, preparatory work involves various steps. In this exemplary project, the following steps can be helpful in preparation:
- What data should be collected?
- Which form of questioning (e.g. which type of scale) best suits the survey?
Registering and creating a project
Register or log in to www.emotouch.de at no charge.
Click on ‘+NEW PROJECT’ in the ‘Projects’ tab.
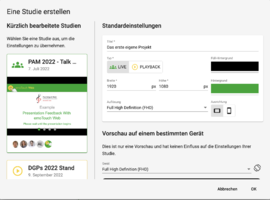
In the ‘Create a project’ dialogue window, select a name for the project. You can make further adjustments or work with the default settings.


The project has now been created and you will be forwarded to the editor.
Designing the project
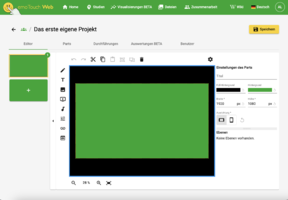
A project usually consists of several parts which, like presentation slides, provide an interactive surface on which data can be collected, information presented or audio and video files played (particularly useful for playback projects).

The editor offers numerous options for customising the individual parts of your project.


You can:
- Add passive elements (decorative/ informative)
- Create text boxes
- Embed audio and video files
- Embed buttons and links
- Integrate interactive websites with iframes
- Create and personalise 1D and 2D scales for real-time data acquisition
Integrate audio and video files
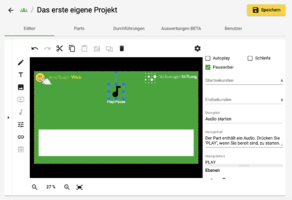
Click the ‘Add audio’ button.
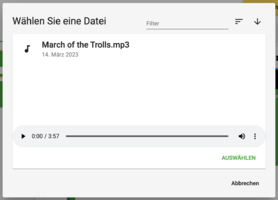
Upload a file here or select an audio from the 'Files' tab that you have previously uploaded there.


Real-time data acquisition: use of scales (sliders)
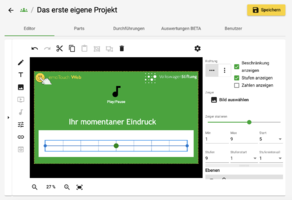
The 1D scales shaped like sliders can be easily added as an element and further customised and personalised in the inspector.
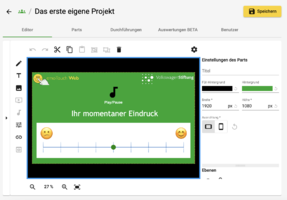
Customise the alignment, values and step intervals according to your needs.


Data collection is always linked to an event (e.g. a piece of music). Create as many parts as you like for different events, which you or the participants can navigate through during realisation.
Realisation
Create realisation
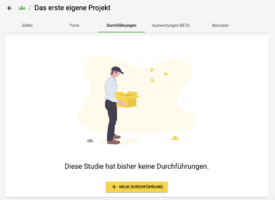
Save the project and click on ‘New realisation’ in the ‘’Realisations‘’ tab.
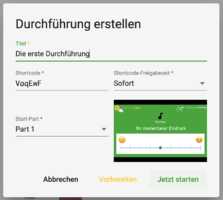
Give the realisation a title and shortcode and set the starting time. You can either activate the realisation now or schedule it to start at a later time.

emoTouch now creates a QR code, a link and a shortcode that participants can use to join the event without registering. The shortcode can be entered on www.emotouch.de.


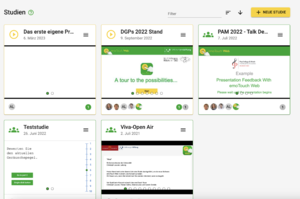
Managing Realisations
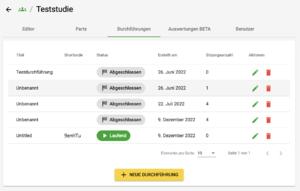
Keep an overview of planned, ongoing and completed realisations in the "Realisations" tab. Any number of participants can join a running realisation. They each create a ‘session’. Click on a realisation in the list for an overview of the sessions that have been created.

You can run several active realisations at the same time. Caution: Pausing is not possible. Ending a realisation will terminate it permanently.
Analysing - exporting values and data

Close the realisation when you have collected all of the desired data. Click on the ‘’‘completed’‘’' realisation that you want to analyse and click the “EXPORT” button.
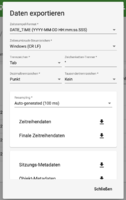
Configure formatting details. emoTouch creates a CSV file with the raw data, or optionally resampled data, which can be further processed with any spreadsheet or statistics software.


Exportierbar sind:
- Zeitreihendaten
- Finale Zeitreihendaten
- Sitzungs-Metadaten
- Objekt-Metadaten
Resampling
For all analyses that involve calculations based on several participants (e.g. calculating the mean value of a slider position across all participants at a specific time stamp), the raw data recorded by emoTouch must be converted into ‘resampled data’.