Application example: Evaluation of integrated media
Here, an exemplary study with emoTouch is used to explain how the individual components of emoTouch can be used. In this example, subjects are asked to rate some movie scenes embedded in emoTouch with associated film music using various scales.
Preparation
At the beginning of a study there are various organizational and conceptual considerations. Especially for the use of emoTouch the following things should be considered:
- What media do I want to use and in what format are the files? With emoTouch, links can be included (YouTube), but also files up to a certain size can be uploaded and then included.
- Do I own the rights to the material?
- Which scenario is more suitable for my research question: live assessment or playback?
- Should other researchers have access to the study? In emoTouch, users can be added to a study as co-owners. If they do not have an emoTouch account yet, they can be invited.
Creating a study
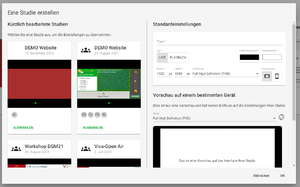
Many of the before asked questions simplify the process of creating a study. To create a study, first navigate to the Study overview. Here, the "New Study" button opens the creation Wizard of the Study Designer. Either select the settings of a previously created study, or make new choices. The settings initially apply to all parts of the study created here.
- Portrait or landscape format?
- Background color of the parts?
- Resolution and aspect ratio?
- Name of the study?
The "Preview on a specific device" function is used to help you adjust the settings to the specific devices or to check what the study would look like on a specific device.
Designing the Parts
In the Part Editor of the Study Designer, there are numerous ways to customize the individual Parts of your study. A Part provides an interactive area where data can be collected. A Part can also present information or play media. For our example, we need (at least) the following Parts:
- asking for the position in the room.
- Collection of master data (age, gender, occupation)
- Evaluation of movie scene 1
- Evaluation of film scene 2
- Concluding slide with forwarding to SoSci-Survey
Use of scales
You can inquire the position in the room with a 2D scale and a background image. Add both elements to the part and adjust them accordingly. important decisions at this point could be:
- What is the orientation of the background image?
- What pointer should the scale use? Default: a circle. You can also upload an image of your own choice (e.g. a chair).
Now a text field with the task can be added.
For the second part, category scales and text fields for the question are suitable. Add these elements to the first part and customize them according to the requirements. Important decisions at this point might include:
- Scale in portrait or landscape format?
- Single or multiple choice?
The third and fourth parts are to be equipped with 1D scales and the according media. You can read more about the integration of media below. The 1D scales can be easily added as an element and further customized in the inspector. Labels, pointers and alignment are the most important adjustable attributes of the 1D scale. Other than that, some thought should be given at this point to the positioning of the elements: where is the scale and where is the media? Can the subject operate the scale while viewing the film clip?
Embed media
If you are not using a YouTube video, media can be uploaded to emoTouch in two places:
- Via the Part Editor
- Via the "Files" tab.
Here you can upload any files to add to the Parts later. Pay attention to copyright and our terms of use here.
